This week we feature an Excerpt from Jimz Garage - This is Now Edition Number 3 from Jimz Garage that is on our website
How to change your tyre on
the
road or in the garage
In this demonstration we are changing a worn out Heidenau rear tyre for a new
Metzeler Karoo T (Touring)
tyre.

Loosen the rear
axle nut then if your
bike
has a centre stand than this is ideal
to get
the
wheel off the ground, otherwise you can use your side stand and prop the rear of the bike up with something you can find such as
timber or a branch etc. Undo the nut and remove your
rear
axle whilst holding the wheel. The chain will need to be taken off the sprocket by moving the wheel forward, no need to break/undo the chain. The rear
wheel
can now be taken out however note where the
wheel
spacers are situated to aid installation. Use a screwdriver
or similar
to prise apart the brake pads on the brake calliper to aid reinstallation of the rear wheel. You
will
probably need to remove the sprocket and cush drive rubbers as well and these are normally a pressed tight fit in the rear hub.
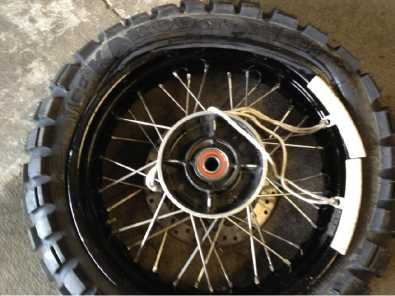
The tyre can now be let down by removing your valve. It is
a good idea to have one of the valve stems
(front or
rear) fitted with a valve removal cap for this purpose.
They are only a couple of dollars. Once the tyre is deflated the next task is to remove
the
bead of the tyre from the rim on both sides of the rim taking care not to
damage,
bend
your brake disc in the process. This can sometimes be a difficult task as most tyres are a very tight fit to the wheel
rim
and need to have the bead broken or cracked. The reason for the tyre bead to the wheel rim contact is to support the edges of the tyre once inflated and to stop tyre rotation. Some wheels are fitted with a rim lock to stop tyre rotation and enabling their
tyres
to be run at lower pressures as
the rim lock acts as a clamp between tyre and rim. So we must break
the bead of the tyre. In some cases the tyre will easily dislodge itself from the rim when you apply pressure to the sidewall of the tyre with the wheel laying flat on the ground. A good way to do this is
using your
heel of your
boot/shoe to apply the pressure. If the bead won’t dislodge another
technique if you do not carry a beadbraker tool
is to use you bikes weight to do this for
you. Place the sidestand onto the wall
of
the tyre close to the rim and transfer the bikes weight through the sidestand onto the tyre to break
the
bead. Refer picture 1. Again be careful that you do not bend your disc and put a rag or similar on the ground to
keep your exposed wheel bearings free of dirt. Once
the
bead is broken on one side you will
need
to turn the wheel
over to do the same on the other side. The tyre bead is broken to
allow the tyre extra movement on the
rim
which will aid in removing the tyre from the rim with your tyre levers.

Picture 1
Make sure the tyre is off the rim all the way around on both sides. Next you will insert a tyre lever between the tyre wall and the rim and proceed to lever off the tyre from the rim on one side. You will need to use two or more levers to perform this task,
Make sure the tyre is off the rim all the way around on both sides. Next you will insert a tyre lever between the tyre wall and the rim and proceed to lever off the tyre from the rim on one side. You will need to use two or more levers to perform this task,
start from one point and work your way around the circumference of the tyre until it comes off the rim. If it is difficult when you start take smaller steps with the tyre levers. Care needs
to be taken that the tyre levers are not inserted too deeply as to cause a puncture to the tube if there is one. If you have rim protectors which are a
semi
circular plastic protector these can be used to prevent your
rims and paint getting scratched but they do make the tyre changing task slightly more difficult by
getting in the way. Refer
picture 2.

Picture 2
Next we can reach in and pull out the tube then repeat the process of taking the secondside of the tyre off the rim using your levers and rim protectors. Refer picture 3.

Picture 3
Now
we
are ready to put on the replacement tyre. There is a rubber band 20 to 25mm wide that is fitted to
the
inside centre of the wheel
rim
on wire spoked rims to
protect the tube from scuffing on the spoke nipples, check to see if it is
in good condition, centred correctly and the hole going through it lines up with the hole in the rim so that the valve stem can be easily pushed through when installing the tube.
Attention needs to be given to the correct orientation of tyre to rim when mounting a
new
tyre. The rotation arrow on the rim and the tyre should be in the same direction
and
in the forward direction when mounted on the bike. Refer
picture 4.

Picture 4
If available it is
a good idea to coat the bead edges of the tyre with a slippery
product such as dishwashing liquid/CRC etc, to help the tyre slip on the rim when
using the levers. Do not use oil based products as you want the tyre contact to
the
rim
to be non slip
after installation is
complete. Start with one side of the rim and tyre and lever it in place working your
way around the circumference again from one point. Once one side is completed the tube needs to be placed into the open side of the tyre. It is a good idea to partly fill the tube with air
so that when you cram it inside
the
tyre and rim
there are no creases and it sits inside the tyre uniformly. Refer picture 5.

Picture 5
Next we need to reach inside the tyre and rim to push the valve through the hole in the rim. This again can be difficult. There are a number of ways to make this easier. You can purchase a valve stem puller which basically is a wire that goes through the hole in the rim then threads inside the valve with a handle on it making it easier to pull the valve through the hole in the rim or you can insert a tyre lever into the opposite side of the tyre from where the tube is being inserted lever the sidewall open and lay the tyre lever and wheel down on the ground whilst pulling up the open sidewall of the tyre which will give more room to work the valve stem through the hole in the rim. Once through thread on the retaining nut so the threaded valve is retained. You can then remove the valve and let the air out of the tube to make mounting the final side of the tyre easier. Again coat the tyre bead with a slippery product then work the first half of the tyre onto the rim by standing on it and working it around with your feet. Stiff shoes or motorcycle
boots make this job easier and the less you have to do with the tyre levers the less chance of pinching the tube. Refer picture 6.

Picture 6
Now that half the tyre is on the rim you can finish the job with the tyre levers. If you find it
is too hard to lever on with the tyre levers, flip the wheel over and stand on the tyre wall to move the tyre off the bead and give the tyre more movement. Proceed on the other side
until the tyre is levered completely onto the rim.
Taking smaller steps around the circumference with the tyre levers will make
the task easier. Again always be careful when inserting
the tyre levers that you do not pinch the tube or you will have to start again and repair holes in your tube. Refer pictures 7 & 8.
Picture 7

Picture 8
Next the valve is put back into the tube and the tyre is inflated so that the tyre beads (2) seat themselves onto the rim. Not recommended to inflate anymore than 70 psi. You should check that the tyre is seated correctly once inflated. Check around the perimeter of the tyre on both sides for an even fit. There is usually a line around the tyre wall by the rim which will help with checking alignment. The slippery product that was applied when putting the tyre on the rim will aid in the tyre seating itself correctly to the rim. When inflating the tyre it is not uncommon for the tyre to pop into place with the pressure. When satisfied that the tyre is seated correctly your air pressure can be returned to the desired/manufacturers pressure. Refer picture 9.

The wheel
can
now be reassembled and reinstalled onto
the bike. Install the chain,
wheel
spacers, axle and nut and tighten to manufacturers specifications.
IMPORTANT; Before using the bike, pump the rear brake pedal
to bring the brake pads back into full contact with the disc otherwise if this
step is not done you will
have no brakes when first depressing the brake pedal. An example of this was
a driver
at
the Bathurst 1000 this year
that
pitted for new tyres and brake pads, upon
leaving the pits and entering the first high speed corner
he
went to use his brakes
however the pedal
went right to the floor as the pedal
was not pumped prior
to use resulting in a spectacular
high speed crash. His day was over. Very important to do
this. Refer
picture 10.

Picture 10
Pump the brake pedal on the
reinstalled wheel.
Also take note of the tyre manufacturers recommendations about tyre loadings and pressures which are normally found on the sidewall
of the tyre. Also refer to your owners
manual for recommended tyre pressures. Refer picture 11.

Lastly and very important remember to scrub in your
new tyres and initially be careful in wet conditions with the tyres
in a
new state. What this means
is that when the tyres are new they have a slippery outside surface (tread)
and need to be used carefully whilst the shinyness on the tread surface is worn through leaving the
tread surface slightly abrasive and ultimately grippy. Keep your
lean
angles, acceleration and braking manoeuvres
conservative till your
tyres become grippy. ( scrubbed in )
Tools rrequired: and can be carried on the bike
Tools specific to your bike to remove wheels.
2 or 3 tyre levers - if these are carried on the bike upwards from 230mm in length is okay
Valve removal tool - Valve cap.
Valve stem retrieval wire - optional
Pump - Can be a mountain bike handpump, 12v powered plug into the bike pump or C02 cartridges and adaptor. (usually at least 3 C02 cartridges are required to inflate one tyre)
Slipper Goo to aid with tyre installation or removal
To fix punctures carry spare tubes and a puncture repair kit or plugs for tubeless tyres. Refer manufacturer's insturctions for the use of these products.
Rim protectors if desired to protect your rims/paintwork from damage.
Happy tyre changing. It is really satisfying being able to change your own tyres not to mention vital for your motorcycling journey should you get a puncture.
Over and Out
Jim Denham
* * * * G R A V E L N E W Z I S S U E S * * * *

The link above houses our most recent and up to date Editions of Gravel Newz - Gravel Newz is designed to keep you up to date and notified of what we are currently working on/ where we are going and much more.
For Newz/Views and Up To The Minute Gravel Issues, You will find it all here in our favourite Newz Tabloid Issues. You may choose to Unsubscribe from Gravel Newz at anytime.
Recently much interest has been expressed to us re our Whanau attending Scenic Leisure touring activities, whilst partners are attending our planned Adventure Rides. Please contact if you are interested and we will provide you with An Agenda to keep you occupied over this time. We will ensure that you meet with partners at the evening. There are many scenic areas of interest that you may enjoy to visit in the beautiful areas around our countryside that we will be taking our Gravel Riders to visit. We will have you joining partners in the evening.
WE are currently working on a tidy-up of our website. We now have a raft of pages that house our many adventures that we have all shared. Over the coming Xmas and New Year holidays, amongst enjoying some time-off, we will be working on many New Adventures for the New Season. "NEW" to our website, pictures from past events have now been added into our hallmark pages. We have also added grey buttons in most of our upcoming webpages that you simply click on to take you over to the Following pages. Simple indeed.
Our standard gravel road rides will be mixed over the "Summer"?? with a good variety of New Adventures that will take us "OVERLAND" and beyond into "New Areas" that NGARNZ has not previously ridden as a Group before. We plan to make the very most of our NEW OVERLAND Adventures". Our Summer season really is a very short one.
Expect the unexpected as we continue to look to surprise and showcase to our two-wheeled Adventure Riders a little more of our country than we would normally see.

No comments:
Post a Comment